TensorRT
Introduction
In this tutorial, we will learn how the PuzzleLib library collaborates with NVIDIA's TensorRT library.
TensorRT provides you a more optimal way to build a neural network architecture and allows quantizing the input data for the network, which ensures either the equal or just a slightly lower quality of the network performance along with a significant increase in the speed of the network inference on the NVIDIA GPU.
Installing TensorRT
Important
Specifications:
- OS - Ubuntu 16.04/18.04 or Windows 10;
- Cuda 10.2 (or the earlier ones, starting with 10.0+);
- CuDNN 7.6 (the required version of cuDNN is specified in the name of the corresponding TensoRT archive)
- TensorRT 7.0 (or the earlier ones, starting with 6.0+).
Important
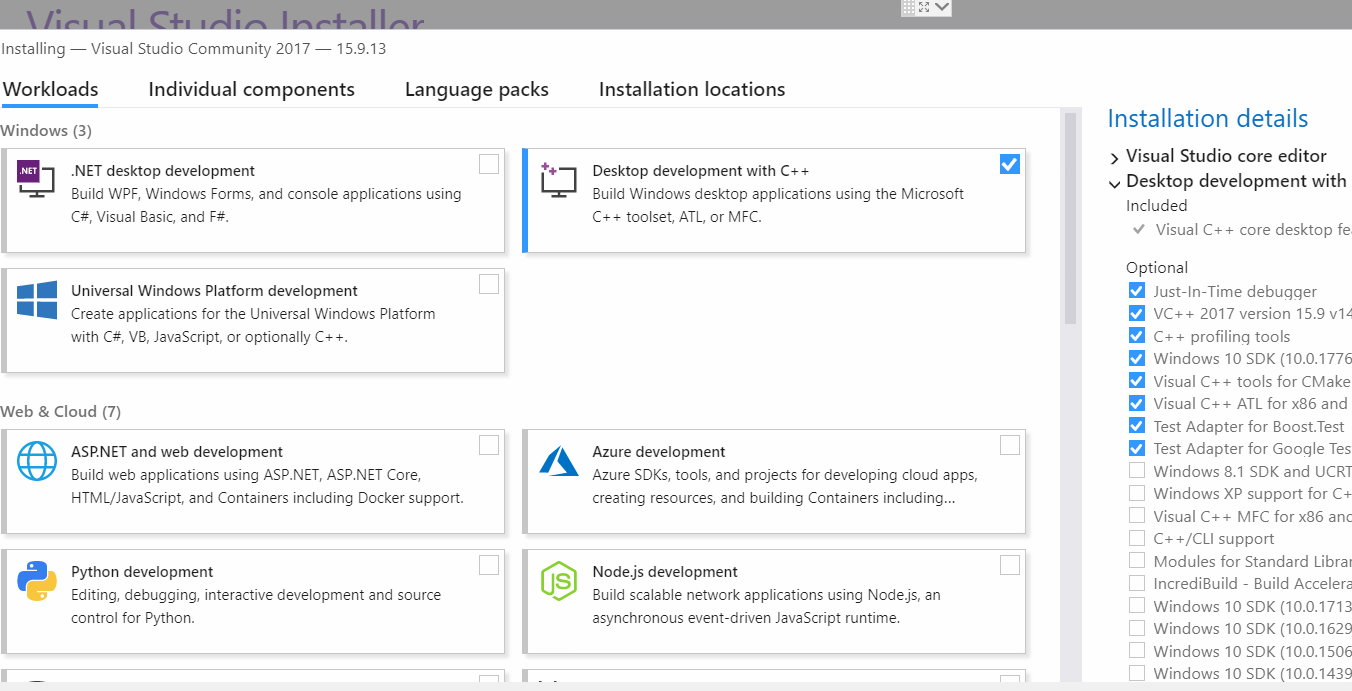
You will need Visual Studio 2017 for Windows 10. You can download the free version installer
here.
Следуем инструкциям инсталлятора. Follow the instructions of the installer. Select only the minimum module for C++ (tick the corresponding check box).
Steps:
- Go to the link from the official NVIDIA website with TensorRT 7.0. Log in or register on the site (it does not take long).
- Load the page with the required version of TensorRT. Tick the checkbox "I Agree To the Terms of the NVIDIA TensorRT License Agreement".
- Click on the link "TensorRT 7.0" - list of options for
TensorRTinstallation will drop.
When installing on Ubuntu 16.04 (18.04 respectively), add three more steps to the previous ones:
U4. In TensorRT 7.0 for Linux => Tar File Install Packages For Linux x86 download TensorRT 7.0.0.11 for Ubuntu 16.04 and CUDA 10.2 tar package U5. Unpack the archive in the terminal and copy part of the content:
tar xvz -f ~/Downloads/TensorRT-7.0.0.11.Ubuntu-16.04.4.x86_64-gnu.cuda-10.2.cudnn7.6.tar.gz
cd TensorRT-7.0.0.11
sudo cp lib/* /usr/lib/x86_64-linux-gnu/
sudo cp include/* /usr/include/
U6. Install codepy and libboost (unless they are already installed):
sudo pip3 install codepy
sudo apt-get install libboost-all-dev
When installing on Windows 10 add five more steps to the first three:
W4. In TensorRT 7.0 For Windows in the Windows ZIP Package download Windows10 and CUDA 10.2 zip package.
W5. Unpack the archive. Move and replace all folders but for lib in the folder: C:\Program Files\NVIDIA GPU Computing Toolkit\CUDA\v10.2 (Cuda is installed there by default)..
W6. Move all .dll files from the lib folder to C:\Program Files\NVIDIA GPU Computing Toolkit\CUDA\v10.2\bin.
W7. Store all .lib files from the lib folder in C:\Program Files\NVIDIA GPU Computing Toolkit\CUDA\v10.2\lib\x64.
W8. Install codepy (unless it is already installed):
pip3 install codepy
Driver Build
The PuzzleLib library has a Converter/TensorRT folder - this is a bridge between PuzzleLib and TensorRT. This module can convert PuzzleLib neural network weights to TensorRT engines, which provides acceleration of network inference on NVIDIA GPU.
Run the script PuzzleLib/Converter/TensorRT/Source/Build.py. It will generate Driver.so for Ubuntu or Driver.pyd for Windows. These binaries contain all the low-level conversion functions.
TensorRT float32
We will need the PuzzleLib/Converter/TensorRT/Tests/ResNet50Test.py script. Download the weights of the trained ResNet-50 model ResNet-50-model.hdf and save in the PuzzleLib/Converter/TensorRT/TestData folder before launching the script.
The script starts with importing all the modules and functions necessary for operation:
from PuzzleLib import Config
Config.globalEvalMode = True

from PuzzleLib.Backend import gpuarray
from PuzzleLib.Models.Nets.ResNet import loadResNet

from PuzzleLib.Converter.Examples.Common import loadResNetSample, loadLabels

from PuzzleLib.Converter.TensorRT.Tests.Common import scoreModels, benchModels
from PuzzleLib.Converter.TensorRT.BuildRTEngine import buildRTEngine, DataType
Loading the weights of the pre-trained ResNet-50 model:
def main():
    net = loadResNet(modelpath="../../TestData/ResNet-50-model.hdf", layers="50")
Upload data that will pass through the network. Here we have a single photo of a spider and a list of classes corresponding to the classes of the pre-trained network:
    data = gpuarray.to_gpu(loadResNetSample(net, "../../TestData/tarantula.jpg"))
    labels = loadLabels(synpath="../../TestData/synsets.txt", wordpath="../../TestData/synset_words.txt")
The most important function builds an engine file that will replace the hdf file (and which will later be used as the weights of the trained model for network inference). After testing this function, an engine file similar to ResNet-50.float32.1-3-224-224.1-1000.GeForce_GTX_1080. engine will appear in the PuzzleLib/Converter/TensorRT/TestData folder.
Info
The name of the engine file contains the following information:
ResNet-50- architecture of the network usedfloat32- format of the input data for the network (could be float32, float16, and int8)1-3-224-224- dimensions of the input data batch for the network (dimensions of the input tensor of the network converted to engine)1-1000- dimensions of the data received at the network output (dimensions of the output tensor of the network converted to engine)GeForce_GTX_1080- the video card which performed the calculations
engine = buildRTEngine(net, inshape=data.shape, savepath="../TestData", dtype=DataType.float32)
Compare the results of the network with weights from the hdf file and the network with weights from the float32 engine file in one image:
scoreModels(net, engine, data, labels)
Should resemble this:
Net top-5 predictions:
#0 tarantula (prob=0.9944478)
#1 barn spider, Araneus cavaticus (prob=0.0049400954)
#2 doormat, welcome mat (prob=7.750382e-05)
#3 hair slide (prob=7.4750096e-05)
#4 earthstar (prob=7.231539e-05)

Engine top-5 predictions:
#0 tarantula (prob=0.9944478)
#1 barn spider, Araneus cavaticus (prob=0.004940091)
#2 doormat, welcome mat (prob=7.750382e-05)
#3 hair slide (prob=7.4750096e-05)
#4 earthstar (prob=7.231518e-05)
As you can see, the results on the same picture are the same (differences in ten-millionth of a degree do not count).
In conclusion, we will compare the operating time of two networks on the same image:
benchModels(net, engine, data)
Should get something like this:
Net    time: device=0.0171503003 host=0.0171508670
Engine time: device=0.0027132156 host=0.0027133632
TensorRT float32 finished more than 6 times faster. At the same time, it is important to remember that ResNet-50 could be easily optimized with fusion (more complex and atypical networks are harder to optimize and do not speed up so quickly). We work with float16 in a similar way - DataType.float32 should be replaced with DataType.float16.
Yet it is important to remember that older NVIDIA GPUs do not support this format (a relevant error will pop up).
TensorRT int8
We will need a script PuzzleLib/Converter/TensorRT/Tests/MnistLenetTest.py.
The script starts with importing all the modules and functions required for its operation.
import numpy as np

from PuzzleLib.Backend import gpuarray
from PuzzleLib.Datasets import MnistLoader

from PuzzleLib.Containers import *
from PuzzleLib.Modules import *
from PuzzleLib.Handlers import *
from PuzzleLib.Optimizers import MomentumSGD
from PuzzleLib.Cost import CrossEntropy

from PuzzleLib.Converter.TensorRT.Tests.Common import benchModels
from PuzzleLib.Converter.TensorRT.BuildRTEngine import buildRTEngine, DataType
from PuzzleLib.Converter.TensorRT.DataCalibrator import DataCalibrator
LeNet network architecture building function:
def buildNet():
    seq = Sequential(name="lenet-5-like")
    seq.append(Conv2D(1, 16, 3))
    seq.append(MaxPool2D())
    seq.append(Activation(relu))

    seq.append(Conv2D(16, 32, 4))
    seq.append(MaxPool2D())
    seq.append(Activation(relu))

    seq.append(Flatten())
    seq.append(Linear(32 * 5 * 5, 1024))
    seq.append(Activation(relu))

    seq.append(Linear(1024, 10))

    return seq
In this example, we do not have the weights of a trained model, so we will train the model ourselves using the training function:
def trainNet(net, data, labels, epochs):
    optimizer = MomentumSGD()
    optimizer.setupOn(net, useGlobalState=True)
    optimizer.learnRate = 0.1
    optimizer.momRate = 0.9

    cost = CrossEntropy(maxlabels=10)
    trainer = Trainer(net, cost, optimizer)
    validator = Validator(net, cost)

    for i in range(epochs):
        trainer.trainFromHost(
            data[:60000], labels[:60000], macroBatchSize=60000,
            onMacroBatchFinish=lambda train: print("Train error: %s" % train.cost.getMeanError())
        )
        print("Accuracy: %s" % (1.0 - validator.validateFromHost(data[60000:], labels[60000:], macroBatchSize=10000)))

        optimizer.learnRate *= 0.9
We need a validation function to compare the results of two networks (normal and with weights from the engine file):
def validate(net, data, labels, batchsize=1):
    cost = CrossEntropy(maxlabels=10)
    validator = Validator(net, cost, batchsize=batchsize)

    return 1.0 - validator.validateFromHost(data[60000:], labels[60000:], macroBatchSize=10000)
Moving on to the main function. We load data for the network:
def main():
    mnist = MnistLoader()
    data, labels = mnist.load(path="../TestData/")
    data, labels = data[:], labels[:]
    print("Loaded mnist")
Fixing the seed of the random number generator:
np.random.seed(1234)
Loading the LeNet model without weights.
net = buildNet()
Training the network:
trainNet(net, data, labels, 15)
To get TensorRT int8 engine, you need to calibrate on the data that makes sense for the source network (in this case, images with handwritten numbers from the MNIST dataset).
calibrator = DataCalibrator(data[:60000])
Switching the network to the test mode:
net.evalMode()
Info
The essential differences between TensorRT int8 and TensorRT float32 are:
- data format
- TensorRT int8 has calibration
- int8 inference is faster, but has a more significant loss in quality (which could be really obvious in some tasks, you would have to calibrate on a large amount of data to fix this)
    engine = buildRTEngine(
        net, inshape=data[:1].shape, savepath="../TestData", dtype=DataType.int8, calibrator=calibrator
    )
Compare the results of the network with weights from the hdf file and the network with weights from an int8 engine file in one image:
benchModels(net, engine, gpuarray.to_gpu(data[:1]))
TensorRT int8 is more than four times faster:
    Net    time: device=0.0009059594 host=0.0009060884
    Engine time: device=0.0002078026 host=0.0002083683
In conclusion, we will compare the results of networks on all data:
    print("Net    accuracy: %s" % validate(net, data, labels))
    print("Engine accuracy: %s" % validate(engine, data, labels, batchsize=1))
You should get something like this:
    Net    accuracy: 0.9933
    Engine accuracy: 0.9931
As you can see, the results have hardly deteriorated.
Using an existing engine file
You should think of an engine file in the same way as of an hdf file - network weights. The only difference in working with them is in uploading this very file:
    import os

    from PuzzleLib.Converter.TensorRT.RTEngine import RTEngine, RTEngineType


    engineFileName = "ResNet-50.float32.1-3-224-224.1-1000.GeForce_GTX_1080.engine"
    enginePath = os.path.join("PuzzleLib", "Converter", "TensorRT", "TestData", engineName)
    netEngine = RTEngine(enginepath=enginePath, enginetype=RTEngineType.puzzle)
We use netEngine as net further (example of inference):
    import numpy as np

    from pycuda import gpuarray


    batchSize = 1
    channelsCount = 3
    imageSize = 224

    batch = gpuarray.to_gpu(np.random.randn(batchSize, channelsCount, imageSize, imageSize).astype(np.float32))
    forward = netEngine(batch)
    result = forward.get()
Congratulations, you have finished the TensorRT tutorial and learned how to speed up inference on NVIDIA GPU!